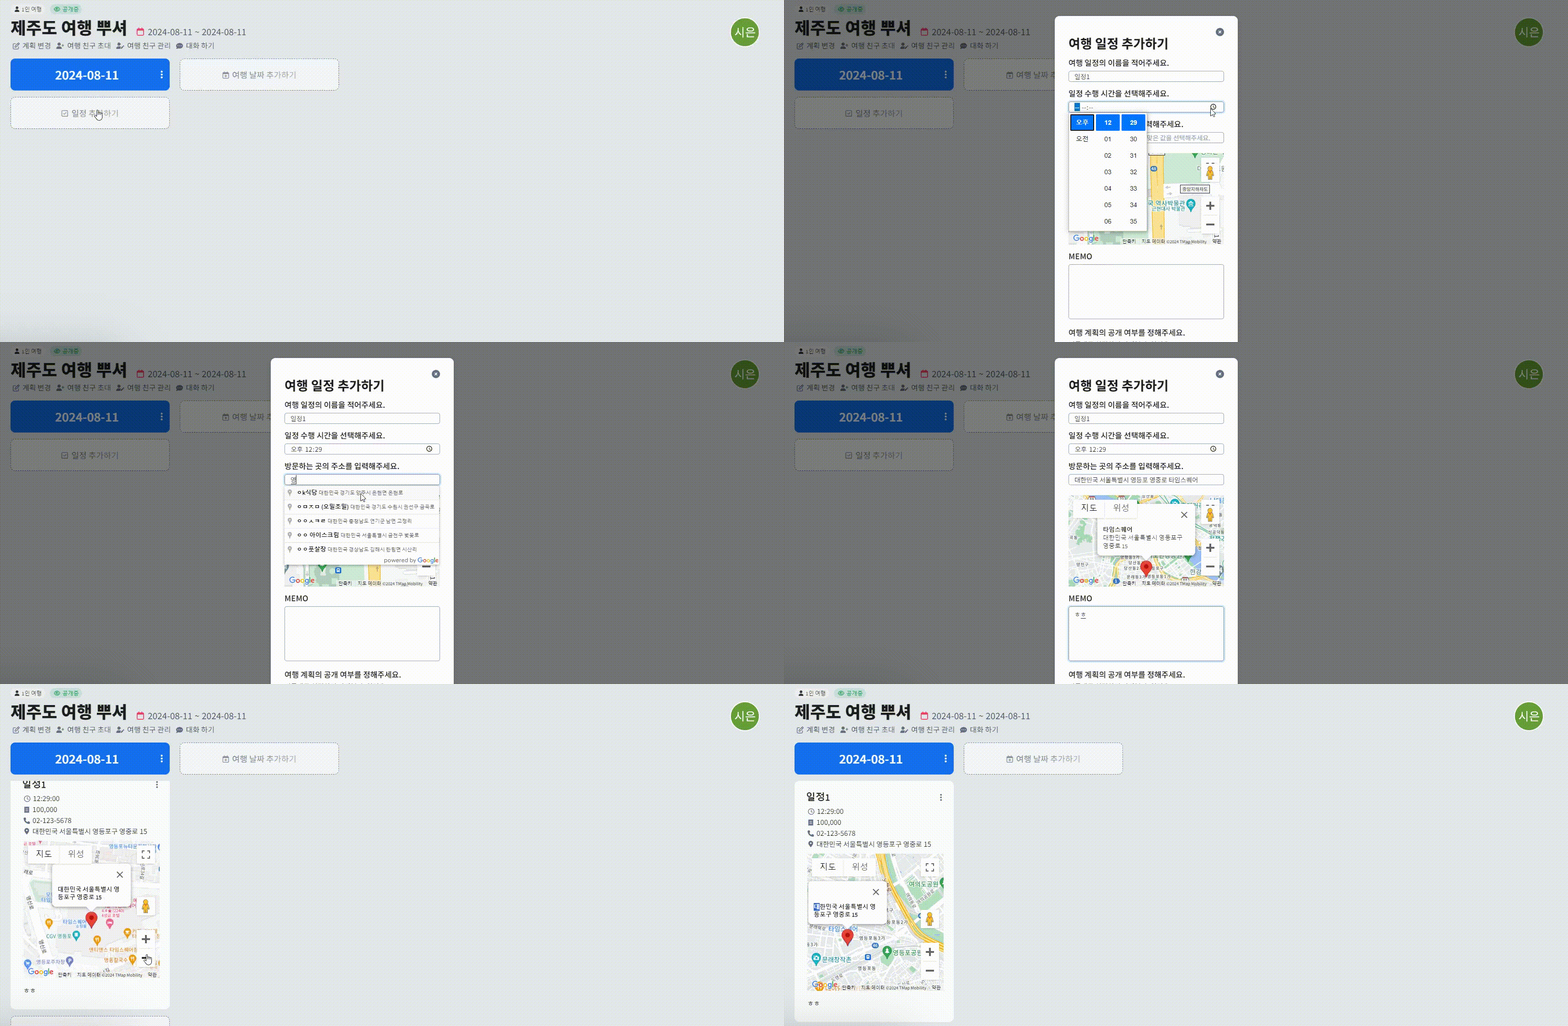
google map api 를 사용한 지도 검색과 지도 생성
서비스에 위치 검색과 동적지도를 넣는 방법을 알려드려요.
1. 화면에 움직이는 지도를 첨부해야 한다면?

지도의 위치를 검색하고, 해당 위치를 바로 보여주고 싶다면 어떻게 해야 할까요? 🤔
2. Vue.js 프로젝트에서 구현하기

2.1. 구글 맵 API Key 발급 받기

이 velog 를 참고하여 구글 지도를 사용하기 위한 API Key 를 발급 받아주세요.
2.2. 환경 설정에 API Key 추가 하기

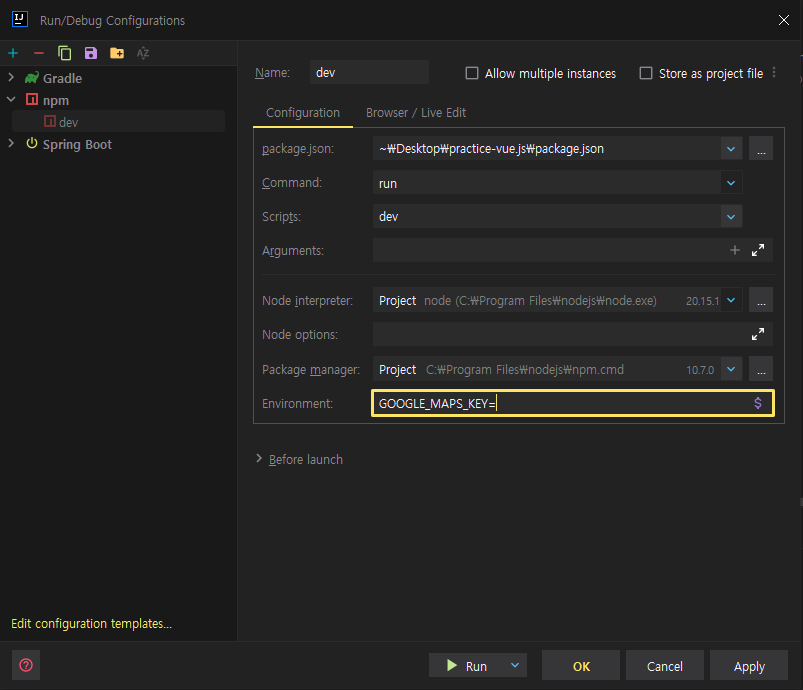
저는 IntelliJ 를 사용하는데요, 아래와 같이 Configuration 에서 환경 변수로 API Key 를 추가해줍니다.
2.3. index.html 에서 구글 지도 script 넣어주기

index.html 에가서 구글 지도를 사용하기 위한 준비를 해줍니다. key 의 경우 환경 변수로 넣어주었기 때문에 아래와 같이 불러와 넣어주세요.
1
2
3
4
5
6
7
8
9
10
11
12
13
14
<!doctype html>
<html lang="en">
  <head>
    <meta charset="UTF-8" />
    ...
      <script type="module" src="https://unpkg.com/@googlemaps/extended-component-library@0.6">
      </script>
      <script type="module">
          const key = process.env.GOOGLE_MAPS_KEY;
          const script = document.createElement('script');
          script.src = `https://maps.googleapis.com/maps/api/js?key=${key}&libraries=places`;
          document.head.appendChild(script);
      </script>
  </head>
2.4. 지도 검색을 위한 vue component 만들기

1
2
3
4
5
6
7
8
9
10
11
12
13
14
15
16
17
18
19
20
21
22
23
24
25
26
27
28
29
30
31
32
33
34
35
36
37
38
39
40
41
42
43
44
45
46
47
48
49
50
51
52
53
54
55
56
57
58
59
60
61
62
63
64
65
66
67
68
69
70
71
<template>
  <div>
    <div ref="searchContainer" class="search-container">
      <input ref="autocompleteInput" type="text" placeholder="주소를 입력 후, 목록에서 알맞은 값을 선택해주세요." class="modal-input"/>
    </div>
    <div ref="mapContainer" class="maps-integration"></div>
  </div>
</template>

<script setup lang="ts">
import { ref, onMounted } from 'vue';

const mapContainer = ref(null);
const autocompleteInput = ref(null);
let map, marker, infowindow, autocomplete;

const emit = defineEmits(['updateAddress']);

const searchPlace = () => {
  const place = autocomplete.getPlace(); // 자동 완성 검색을 위한 부분입니다.
  if (!place.geometry || !place.geometry.location) return;

  updateMap(place);
  emit('updateAddress', place.formatted_address);
};

const updateMap = (place) => {
  if (!place.geometry || !place.geometry.location) return;

  map.setCenter(place.geometry.location);
  map.setZoom(12);

  marker.setPosition(place.geometry.location);
  infowindow.setContent(
      `<strong>${place.name}</strong><br>
     <span>${place.formatted_address}</span>`
  );
  infowindow.open(map, marker);
};

onMounted(() => {
  const mapOptions = {
    center: { lat: 37.574187, lng: 126.976882 }, // 맨처음 기본 위치입니다. 마음대로 수정 가능해요!
    zoom: 17,
  };

  map = new google.maps.Map(mapContainer.value, mapOptions);
  marker = new google.maps.Marker({ map });
  infowindow = new google.maps.InfoWindow();

  autocomplete = new google.maps.places.Autocomplete(autocompleteInput.value, {
    fields: ["geometry", "name", "formatted_address"]
  });
  autocomplete.addListener("place_changed", searchPlace);
});
</script>

<style scoped>
@import "../assets/styles/modal.scss";

.search-container {
  margin-bottom: 14px;
}

.maps-integration {
  width: 100%;
  height: 200px;
  margin-bottom: 16px;
}
</style>
2.5. 지도를 그리기 위한 component 만들기

1
2
3
4
5
6
7
8
9
10
11
12
13
14
15
16
17
18
19
20
21
22
23
24
25
26
27
28
29
30
31
32
33
34
35
36
37
38
39
40
41
42
43
44
45
46
47
48
49
50
51
52
53
54
55
56
57
58
59
60
61
62
<template>
  <div ref="mapContainer" class="maps-integration"></div>
</template>

<script setup lang="ts">
import {onMounted, ref, watch} from "vue";

const props = defineProps({
  address: String
});

const mapContainer = ref(null);
let map, marker, infowindow;

const initializeMap = () => {
  const mapOptions = {
    center: { lat: 37.574187, lng: 126.976882 },
    zoom: 14,
  };

  map = new google.maps.Map(mapContainer.value, mapOptions);
  marker = new google.maps.Marker({ map });
  infowindow = new google.maps.InfoWindow();
};

const geocodeAddress = (address) => {
  const geocoder = new google.maps.Geocoder();
  geocoder.geocode({ address }, (results, status) => {
    if (status === 'OK' && results[0]) {
      const location = results[0].geometry.location;
      map.setCenter(location);
      map.setZoom(17);

      marker.setPosition(location);
      infowindow.setContent(
          `<strong>${results[0].formatted_address}</strong>`
      );
      infowindow.open(map, marker);
    } else {
      console.error('Geocode was not successful for the following reason: ' + status);
    }
  });
};

onMounted(() => {
  initializeMap();
  geocodeAddress(props.address);
});

watch(() => props.address, (newAddress) => {
  geocodeAddress(newAddress);
});
</script>

<style scoped lang="scss">
.maps-integration {
  width: 100%;
  height: 200px;
  margin-top: 5px;
}
</style>
2.6. 알맞은 곳에서 사용하기

위에서 작성한 컴포넌트를 사용하기 위해 아래와 같이 작성합니다.
1
2
3
4
5
<div class="modal-sub-title" style="margin: 8px 0 2px 0">방문하는 곳의 주소를 입력해주세요.</div>
<!-- 지도를 검색하는 부분 -->
<SearchAddress  @updateAddress="handleCreatePlanAddress"/>
<!-- 검색결과를 지도로 그려주는 부분 -->
<div ref="mapContainer" class="map-container"></div>
3. 지도에 나온 주소를 저장하고 싶다면?

주소를 검색하고, 지도를 그리는것 뿐만이 아니라 이를 저장하고 싶을 수도 있습니다. 처음에 보여줬던 계획 생성에 대한 코드로 설명 드릴게요. 😀
1
2
3
4
5
6
7
8
9
10
11
12
13
14
15
16
17
18
19
20
21
22
23
24
25
26
27
28
29
30
31
32
33
34
35
36
37
38
39
40
41
42
43
44
45
46
47
48
49
50
51
52
53
54
55
56
57
58
59
60
61
<template>
	...
	<!-- 여행 일정 추가 모달 -->
	<Modal :isOpen="modalStore.createPlanModalOpen[detail.planBoxId]" :close="() => closeCreatePlanModal(detail.planBoxId)">
		<template #header>
      여행 일정 추가하기
    </template>
    <template #content>
      <div class="modal-sub-title" style="margin: 10px 0 2px 0">여행 일정의 이름을 적어주세요.</div>
      <input v-model="plan.title" class="modal-input"/>
      <div class="modal-sub-title" style="margin: 8px 0 2px 0">일정 수행 시간을 선택해주세요.</div>
      <input v-model="plan.time" type="time" class="modal-input"/>
      <div class="modal-sub-title" style="margin: 8px 0 2px 0">방문하는 곳의 주소를 입력해주세요.</div>
      <SearchAddress  @updateAddress="handleCreatePlanAddress"/>
      <div ref="mapContainer" class="map-container"></div>
      <div class="modal-sub-title" style="margin: 10px 0 2px 0">MEMO</div>
      <textarea v-model="plan.memo" class="modal-input" style="height: 120px; resize: none"/>
      <div class="modal-sub-title" style="margin: 10px 0 8px 0">여행 계획의 공개 여부를 정해주세요.</div>
      <div class="modal-text" style="margin: 10px 0 8px 0">비공개로 설정하면 나만볼 수 있어요.</div>
      <div class="modal-flex-row" style="margin-bottom: 28px">
      <input v-model="plan.isPrivate" type="checkbox" style="margin-right: 5px" />
      <span class="modal-text" style="margin-bottom: 4px">비공개로 설정하기</span>
      </div>
      </template>
      <template #footer>
		    <button @click="handleCreatePlan(detail.planBoxId)" class="modal-button">추가 하기</button>
	  </template>
	</Modal>
	...
</template>

<script setup lang="ts">
...
const plan = ref({
  isPrivate: false,
  title: '',
  time: '',
  address: '',
  memo: ''
});

...
const handleCreatePlanAddress = (address) => {
  plan.value.address = address;
  console.log(address);
};

const handleCreatePlan = async (planBoxId) => {
  const data = {
    isPrivate: plan.value.isPrivate,
    title: plan.value.title,
    time: plan.value.time,
    content: plan.value.memo,
    address: plan.value.address
  }

  createPlan(plannerId.value, planBoxId, data);
  closeCreatePlanModal(planBoxId);
}
...
</script>
3.1. SearchAddress 컴포넌트에서 장소 검색하기

장소를 검색하면, 아래 부분에서 특정 장소에 대한 값을 받아옵니다.
1
2
3
4
5
6
7
8
9
10
11
12
13
14
15
import { ref, onMounted } from 'vue';

const mapContainer = ref(null);
const autocompleteInput = ref(null);
let map, marker, infowindow, autocomplete;

const emit = defineEmits(['updateAddress']);

const searchPlace = () => {
  const place = autocomplete.getPlace(); // 자동 완성 검색을 위한 부분입니다.
  if (!place.geometry || !place.geometry.location) return;

  updateMap(place);
  emit('updateAddress', place.formatted_address);
};
3.2. emit 으로 보낸 값 받기

아래 컴포넌트를 사용하는 부분에서 emit 에 지정한 이름을 사용하여 주소값을 받습니다.
1
<SearchAddress  @updateAddress="handleCreatePlanAddress"/>
그리고 이는 handleCreatePlanAddress 에 넘겨지게 됩니다.
1
2
3
4
const handleCreatePlanAddress = (address) => {
  plan.value.address = address;
  console.log(address);
};
3.3. 서버에 보낼 request 만들기

이제 서버에 보낼 plan request 를 완성할 수 있습니다. 🤗
1
2
3
4
5
6
7
8
9
10
11
12
13
14
15
16
17
18
19
20
const plan = ref({
  isPrivate: false,
  title: '',
  time: '',
  address: '',
  memo: ''
});

const handleCreatePlan = async (planBoxId) => {
  const data = {
    isPrivate: plan.value.isPrivate,
    title: plan.value.title,
    time: plan.value.time,
    content: plan.value.memo,
    address: plan.value.address
  }

  createPlan(plannerId.value, planBoxId, data);
  closeCreatePlanModal(planBoxId);
}
This post is licensed under
CC BY 4.0
by the author.

